Quantcast
Channel: nail art – Chickettes: Soak-Off Gel Polish Swatches, Nail Art and Tutorials
Viewing all 131 articles
Browse latest View live

Ohio State Nail Art

$
0
0

I just wanted to share my nails for the graduation party this weekend… I’m going with the Ohio State theme since that’s where my daughter will be going in less than two months.  I found these nail decals on eBay. The Lucky Star Style Nail store has lots of different designs and these decals actually work with gel polish!  I was skeptical, but gave it a try and so far they have worked out great.  They are sort of a hybrid between a water decal and sticker.  You cut out the design, place it on the nail and hold a wet cloth on it for a few seconds then remove the backing.  I placed it right on top of my last layer of gel color and then applied the top coat over it.

The colors used in this manicure are Gelish Hot Rod Red (scarlet), Gelish Cashmere Kind of Gal (gray), and Couture Ooh La La French.  I’m very happy with how this turned out, and now I’m eager to buy more decals to try out.

Chickettes.com Ohio State Nail Art


Patriotic 4th of July Nail Art

$
0
0

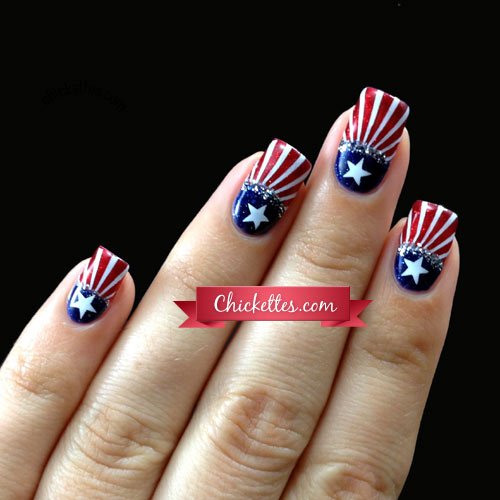
Happy Independence Day (two days early)! I’m in a very patriotic mood, and what better way to show it than with good ‘ol red, white, and blue with stripes and stars! I stayed up half the night working on this mani and I actually did both hands (sometimes I only do nail art on one hand, shhhhh…). This is very sparkly in person because I used two gorgeous Gelish glitter polishes for the main colors.

I first used a dotting tool to apply the blue half moons.  The first coat is Gelish Caution, and for the second coat I used Gelish Holiday Party Blues.  Then I painted the red onto the tips using Gelish Queen of Hearts for the first coat and Good Gossip for the second coat.  (The two glitter polishes wouldn’t have been opaque enough on their own in just 2 coats.)  I applied a thin layer of Gelish TIO and then stamped on the stripes and stars with Konad White polish. The stripes are from Bundle Monster plate BM301, and the stars are from Cheeky plate CH5. I used my dotting tool again to apply a thin line of silver glitter over the top of the half moon with Ink Chrome Silver, and finished it off with another coat of Gelish TIO.

Chickettes.com Patriotic 4th of July Nail Art

Water & Hibiscus Flower Nail Art

$
0
0

I’ve been wanting to try this bubble nail art technique that I saw posted on Gelish Mini’s FB page. I was trying to come up with ideas for a fun vacation themed mani and this effect reminds me of water when done with blues.  This was my first time trying this technique.  It was easy to do, but I think my dots of top coat were too big because the polish ended up a little thick on the sides of my nails.  You can really see that on the middle finger.  I also added a layer of glitter over the bubble/water effect and it kind of hides the pattern.  I’m going to try this technique again soon to see if I can perfect the look.

I started with two coats of Sheek White and one coat of Ali Baba Sim Sala Bam.  Then I applied one coat of My Favorite Accessory (teal), and Deep Sea (dark blue/purple) onto my nails and used a dotting tool to drop little circles of top coat into the color before curing.  I let the dots spread for a few seconds, cured, and applied another coat of Ali Baba on top.  Finally, I topped it all off with my Gelish TIO.  Whew… that’s a lot of coats of polish!

The hibiscus flowers are stickers/decals from Lucky Star Style Nail Decals.  The decals are actually pink, but when applied over blue they look purple, which turned out to be perfect for this mani!  These decals work great with gel polish.  If you’d like to try them out you can use the code “firstorder” when checking out at Lucky Star Style to save 20% on your first order.

Chickettes.com Water & Hibiscus Flower Nail Art with Gelish Chickettes.com Water & Hibiscus Flower Nail Art with Gelish

Beach Manicure

$
0
0

Hi everyone! I just got home from a week on the beach with family and friends in Siesta Key, Florida. We had a great time, though the weather didn’t fully cooperate. We had a few storms and more rain and overcast skies than usual, but the temperatures were very comfortable with the beach breeze and we still tanned even on the overcast days.

I stayed up late the night before our flight and changed my polish. I didn’t have time to take pictures at home, so I grabbed a quick shot while I was on the beach the first day. My new bikini is teal and purple, so I went with a simple teal and purple theme using Gelish Radiance is My Middle Name and You Glare, I Glow. I used some loose glitter to add a glitter gradient to most of my nails, and stamped a tropical flower design onto my middle finger using Bundle Monster plate 318 and Konad white. My mani lasted perfectly through the week and was a great compliment to my new suit!

Chickettes.com Beach Nails

Nail Art with Feather Water Decals from the Born Pretty Store

$
0
0

Chickettes.com Nail Art with Feather Water Decals

I’m always looking for nail art decorations that will work well with gel polish and I have another one to share with you today.  The Born Pretty Store sent me these feather water decals to try.  The set comes with 11 different feather designs, and I chose to use the pink and purple ones to spice up the color that I’m currently wearing (Ink Mauvelous).  Most water decals that I’ve tried don’t work with with SOG… they slip and slide around and don’t get a good bond.  I’m happy to report that these ones work really well!  I’ve been wearing them for a few days now with no lifting or peeling.

Chickettes.com Nail Art with Feather Water Decals

I applied these decals right on top of my current mani which already had a top coat.  For SOG application, I would recommend wiping off the tacky layer before applying these.  For regular nail polish, just let your polish dry before applying.  These are the steps:

  • Remove the clear plastic film from the sheet.
  • Cut out each individual design with scissors.
  • Dip the decal into warm water for 10-20 seconds.
  • Rub the decal between two fingers to remove the white paper backing.
  • Apply and position the decal on your nail, smoothing out any bubbles or wrinkles.  The decals will be slippery when they are wet and should move around pretty easily.  I recommend leaving a slight space between the decal and the edge of your nail to allow the top coat to bond to the nail.
  • Allow the decals to dry completely.  Use a fan or blow dryer.
  • Optional: Apply any decorative accents.  I used a dotting tool to add some white dots around the feathers.
  • Apply your top coat and cure/dry.

Chickettes.com Nail Art with Feather Water Decals

A nice thing about these decals is that they’re very opaque and will work well even on darker colors.  Most of the other decals I’ve tried were very transparent and could only be applied on white or very light colors.  Decals are a great way to add art to your manicure quickly and with very little skill required.

Use code XTL91 to save 10% on your next order from the Born Pretty Store!

Use code XTL91 to save 10%

Here are some photos of the product, and close-up shots of some of the designs.

Born Pretty Store Feather DecalsBorn Pretty Store Feather DecalsBorn Pretty Store Feather Decals

Simple Gold Polka Dots and Glitter Manicure

$
0
0

I haven’t experimented much with polka dots, so I thought I’d give it a shot. I love the classic look of uniform dots, and I have seen a lot of cute manis lately with metallic dots on white.  I used a combination of different SOG brands for this mani.  The green polish is Ink Wasabi, the blue is Entity1 Electric Runway and the white is Couture Ohh La La French.  I topped each off with Gelish TIO.  I added a couple of rhinestones to the green nails, and some loose gold glitter to my middle finger using the technique in my glitter gradient video.  The gold dots were done with a dotting tool and China Glaze Magical, which is also a great polish for stamping.

I’m sorry I only have one picture today.  I took a bunch, but most of them didn’t turn out very well – my lightbox drowned out the details of the polka dots in most of them… I swear they look better in person.  So this is just a quickie post today.  I’m working on some more Gelish swatches tonight.  I don’t have the new collection yet, so don’t get your hopes up!  I’m still working my way through some of the existing colors.

Chickettes.com Gold Dots & Glitter Nail Art

Shellac Tutti Frutti w/Zebra Print & Glitter

$
0
0

This design was inspired by some pictures that I saw on Instagram over the weekend.  This nail artist features several designs with one nail that’s half animal print, half glitter with rhinestones separating the two.   I knew I had to give it a try, and am so glad I did!

The pink is Shellac Tutti Frutti, which has a pearly finish with a bit of purple iridescence.  The glittery effect was achieved by applying one coat of Couture High Maintenance followed by two coats of Ink Chrome Silver.

It took a lot of steps to achieve the half-and-half look.  I started with one coat of High Maintenance on the whole nail, then wiped off the tacky layer and applied a piece of nail art striping tape down the middle of the nail.  I painted two coats of Tutti Frutti on one side, removed the tape, wiped the tacky layer and applied a fresh piece of tape over the pink edge.  I applied 2 coats of Ink Chrome Silver on the second half.  I applied a thin layer of Gelish TIO over the whole nail, wiped off the tacky layer and then used a piece of scotch tape to cover up the glitter side of the nail so that I could stamp the zebra print onto just the pink half.  I used a dotting tool to apply Gelish Foundation down the center of the nail and then added the rhinestones on top while the foundation was still wet, then cured.  I applied one coat of Gelish TIO over the whole nail.  Ta-da!

Anyone interested in a video to see how this is done, or did I explain it well enough?

Chickettes.com - Shellac Tutti Frutti with Zebra Print, Glitter & Rhinestones

Chickettes.com - Shellac Tutti Frutti with Zebra Print, Glitter & Rhinestones

Note: I don’t normally mention this in my explanations because it seems redundant, but when applying gel polish you have to cure each coat with a UV or LED lamp.

Stamping Dark Roses

$
0
0

I bought the DRK-A stamping plate and a new XL squishy stamper and decided to play with them a bit. The concept of the squishy stamper is great… it’s supposed to be awesome for curvy nails like mine because you can just press it onto your nail and it will wrap around it.  Unfortunately I just can’t get the darn thing to work right! Most of the time it won’t pick up the images, and if it does the image isn’t fully opaque. I heard that you need to file them down and/or wipe them with acetone before using. I tried every trick that I read online and still can’t figure it out… very frustrating. This is the second one that I purchased because I thought for sure something was wrong with the first one that I bought. Anyway, after playing around with my various stampers and stamping polishes I decided that my Konad stamper still works the best, even though I have to roll the images onto my nails. So be it.

I was wearing a burgundy-colored gel polish (can you guess which one it is??? official swatches coming soon), and decided to go for a dark look by stamping a black rose pattern on top. This actually looked much cooler before I applied the top coat because the black polish dried to more of a matte finish. I wish I had taken pictures of it that way. (While I’m making wishes… I also wish for a matte gel top coat!! Anyone know of one?)

Even though I’m sharing this with you, I’m feeling kind of “meh” about it.  I don’t like how it looks with the glossy finish and I probably shouldn’t have applied the top coat over the little black gems… they look like blobs.

gelish-dark-roses-2
gelish-dark-roses-


Blue-Green Gradient with Color Blocking

$
0
0

It’s been a busy week!  My daughter leaves for college on Saturday, so we’ve been trying to get her all packed and prepped for her new adventure.  It’s an exciting time and we’re both experiencing a range of emotions.  She’s my only child, so I’ll be living alone for the first time in my life after she leaves.  Something tells me I’m going to have more time to spend on nail stuff soon…

My mani today was inspired by Sammy of The Nailasaurus.  I saw this image pop up on my Pinterest feed and bookmarked it for a future date, and today was the day I finally tried it.  I started with IBD Jupiter Blue as my base, and then sponged Gelish Don’t Be Such a Sourpus onto the tips.  The color that I sponged on is yellow-ish, but it looks green when applied over the blue.  I wiped off the tacky layer and applied nail art striping tape to my nails to block off the center section. The black that I applied to the sides is actually regular nail polish and not gel.  I used Cult Nevermore because it’s completely opaque with just one coat.  I let it dry and then applied my gel top coat and studs.

I love this look… it’s so simple and sleek, but it took a good amount of time to do.  You could try this with so many different color combinations.
Chickettes.com Blue-Green Gradient with Color Blocking

Chickettes.com Blue-Green Gradient with Color Blocking

Here is IBD Jupiter Blue… I love this color!  IBD is a  more affordable brand of gel polish and the quality and application are great.

Chickettes.com IBD Jupiter Blue SwatchChickettes.com IBD Jupiter Blue Swatch

Rainbow Dots with CND Additives

$
0
0

I’m learning about additives and how to use them to create different nail art effects. A friend was kind enough to share her CND additive collection with me, so now I have a whole new set of goodies to play with.  Additives are pigmented powders that you can layer over gel polish to create different effects (there are other uses, but this is how I will likely be using them most).  She showed me this technique using additives to create a dotted manicure with a rainbow gradient. This was my first attempt at it.  It’s not perfect, but it looks so cool!

I started with two coats of Ink Glacier and I used a brush to apply different color additives on top of the tacky layer. I used a dotting tool to add dots of Gelish TIO on top. After curing for 30 seconds, I used an alcohol wipe to wipe off the exposed additives and was left with this effect.  You can see that some of my dots ran together.  Next time I’ll flash cure each finger to keep the TIO from running together.  Pretty cool, huh?

Chickettes.com Rainbow Dot Effect Using CND Additives

Here’s what my nails looked like before I wiped off the excess.  I’m really impressed with the coverage of the additives.  You can’t even tell there’s white polish underneath.

Rainbow Dot Effect Using CND Additives

And here’s a quick shot of my new additive collection.  Linda was kind enough to send me little pots of each color with handwritten labels.  A little really goes a long way with these powders, so this will last me a LONG time.  Thank you, Linda!!

Additives

Gradient Zebra Stripe Manicure

$
0
0

I’ve been playing with CND additives again!  It’s SO easy to create gradients with additives… why did I wait so long to try these?

For this mani I started off with 3 coats of Couture Little Black Dress, and then applied three different color additives into the tacky layer of my gel polish to create a gradient effect.  At the base of my nails I used CND Antique Bronze, then CND Pink Gold Sparkle in the middle, and CND Violet Pearl on the tips.   I blended them together well to create a seamless gradient.  Then on all of my nails except the ring finger, I used a dotting tool dipped into Gelish Top It Off to randomly apply some stripes.  After curing the TIO, I used alcohol wipes to remove the excess additive powder.  I applied a coat of TIO on all of my nails and cured one last time.  On the ring finger I added some round gold studs provided to me by the Born Pretty Store.

Chickettes.com - Gradient Zebra Stripe with CND Additives

Chickettes.com - Gradient Zebra Stripe with CND Additives

Here’s a shot of what my nails looked like BEFORE the excess additive powder was wiped off.

Chickettes.com - Gradient Zebra Stripe with CND Additives

And these are the cool studs that I added tot he ring finger. This set of nail art studs from the Born Pretty Store includes gold and silver studs in many different shapes and sizes, including circles, squares, teardrops, hearts and stars.  Save 10% on your next Born Pretty Store order with coupon code XTL91.

cnd-additive-zebra-3

VIDEO: Nail Art with CND Additives

$
0
0


I took a little hiatus from making videos, but I finally have a new one for you!  I documented the new techniques that I recently learned using CND Additives.  In this this video you’ll learn how to create a gradient, how I did my recent zebra stripe and polka dot nail art, and a new watercolor effect that I just picked up.  It turned out a bit long, but I wanted to combine all of the additive techniques in one video rather than stopping and starting to create separate ones.  Let me know if you have any questions!

These are the products used in this video:

VIDEO: Nail Art Stamping Basics

$
0
0

I’ve been promising to make a video about nail art stamping and it’s finally done!  The video is a little long, but I started by showing the basic technique and tools involved and then went into more detail about the different tools and some tips and tricks.  Let me know if you have any questions… and if you know how to resolve my XL stamper problem!

In case you’re wondering, the color on my nails is Gelish It’s a Lily. :)

These are the products discussed in the video:

Basics:

  • Acetone or polish remover
  • Cotton balls, pads or swabs
  • Lint roller or tape
  • Credit card
  • Paper towels

Polishes:

Stampers:

Stamping Plates:

Gelish 2013 “You Can Make a Difference” Breast Cancer Awareness Trio

$
0
0


This is my manicure in honor of Breast Cancer Awareness Month. To get this look I applied Gossip Girl on the index and pinky fingers, Go Girl on the accent ring finger, and one coat of Izzy Wizzy over each. I stamped the ribbon onto the accent finger using Bundle Monster Stamping Plate BM321. My middle finger has two coats of Artic Freeze with a pink holographic glitter gradient.

Chickettes.com Breast Cancer Awareness Manicure

As most of you know, October is National Breast Cancer Awareness Month. Gelish has released a new limited-edition collection called You Can Make a Difference, that includes two pink gel polishes and a special effects overlay. Gelish will donate 5% of the proceeds for this collection to the Susan G. Komen Foundation to help find a cure for breast cancer.

The colors in this trio are Go Girl, Gossip Girl and Izzy Wizzy Let’s Get Busy. These are existing colors in the Gelish line, but the set of three is limited-edition and will be available for sale through October.

Gelish You Can Make a Difference - Breast Cancer Awareness Collection

Gelish Gossip Girl Color Swatch gelish-go-girl-2 gelish-izzy-wizzy-2


Gelish Matte/Glossy Chevron

$
0
0

I wanted to play a little with the new Gelish Matte Top It Off and I decided to try a chevron pattern that’s matte & glossy. The ring finger has two coats of Gelish Black Shadow topped with the Matte Top It Off. I wiped off the tacky layer and applied two chevron stickers over the matte finish, and applied a thin coat of regular Gelish Top It Off. I flash cured the TIO, pulled off the stickers, and then finished curing.

My middle finger and thumb have two coats of Artic Freeze and were stamped with Bundle Monster Plate BM414 and Konad black polish. They are also topped off with the Matte TIO.  (The new Bundle Monster Create Your Own Collection has some really amazing designs – these designs were created and submitted by nail art fans.  The set includes many popular designs such as chevrons, drips, and tribal patterns.)  My index finger has three coats of Gelish Shake Your Money Maker, and the pinky has three coats of Gelish Showstopping and both are topped with the regular TIO.

The Gelish Matte TIO takes on the matte finish after wiping the tacky layer off, but I found that if you apply oil or moisturizer to your hands the finish is more satiny. If you just cleanse the nail with alcohol again it will look matte again.

Chickettes.com Matte/Glossy Chevron & Fingerprint Nail Art Chickettes.com Matte/Glossy Chevron & Fingerprint Nail Art Chickettes.com Matte/Glossy Chevron & Fingerprint Nail Art


Glow-in-the-Dark Halloween Spiderweb Nail Art

$
0
0

My nails are getting shorter and shorter… I keep filing them down as I get more into rock climbing. It’s impossible to hold onto those little grips with long fingernails. I may eventually switch from the current square shape to a more rounded shape, but I really love square nails so we’ll see about that.

Anyway, this is my first Halloween-themed nail art of the season. I LOVE HALLOWEEN!! I can’t believe how quickly it’s sneaking up on me this year. It’s probably safe to say that you’ll be seeing a few more themed designs in the coming weeks. For this mani I started with two coats of Gelish Orange Cream Dream, and then I applied a glow-in-the-dark pigment powder into the tacky layer. I thought the glow powder that I used was orange, but they seemed to glow green. I applied a thin layer of my Gelish TIO over the pigment powder, wiped the tacky layer, and stamped the spiderwebs on using my DRK-A stamping plate and Konad black polish. One more thin layer of TIO was applied over top for protection & shine.

I held my nails under a light for a few seconds to get the glow powder activated and you can see what they looked like when the lights were turned off! I can’t wait to try more glowing designs. My nails glowed under the covers all night last night, though over time the glow does tame down so the design over top isn’t as visible.

Glow in the Dark Spiderweb Nail Art

Glow-in-the-Dark Haunted House Halloween Nail Art

$
0
0

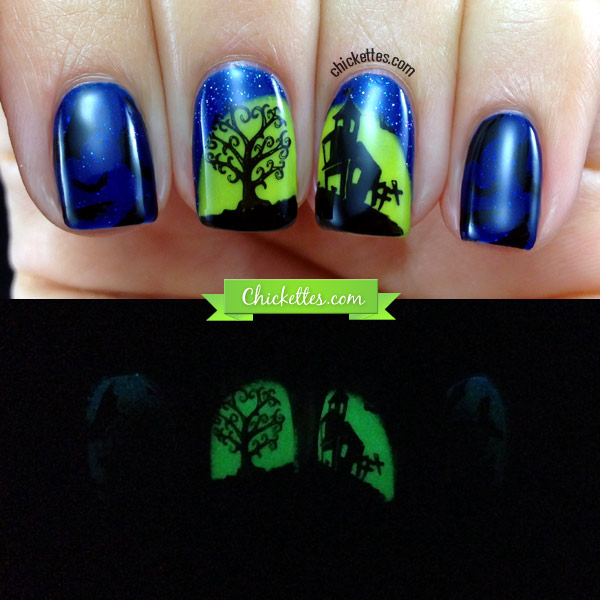
I love playing with these glow-in-the-dark pigment powders. Here’s another Halloween themed mani, complete with a glowing moon, haunted house, tree and bats.  I applied a base of Gelish Holiday Party Blues, then painted on the round moon shapes using Ink Daffodillic.  I applied some yellow glow powder into the tacky layer of the yellow polish and then applied a thin layer of top coat. I stamped on the designs using several different stamping plates.  The tree is from BM409, the house from BM305, and the bats are from Cheeky Jumbo Plate #6.

The bats on the index and pinky fingers are a little hard to see.  I had the idea to apply some dark blue glow powder to the outer edges of those nails to make the sky glow blue behind them in the dark, but it seems I didn’t add quite enough glow powder to pull that off.

Chickettes.com Glow-in-the-Dark Halloween Nail Art Chickettes.com Glow-in-the-Dark Halloween Nail Art

Bloody Dracula Nails for Halloween

$
0
0

It wouldn’t be Halloween without a little blood and gore… although this is actually cartoon-ish gore.  I’ve seen lots of nail art on Pinterest with little spooky characters and I wanted to try my hand at creating Dracula.  I think he turned out kinda cute.  This was mostly done with Gelish though I used acrylic paint to draw Dracula’s face.  I used Gelish Artic Freeze as the white base and Cashmere Kind of Gal for the grey base.  I added the blood drops using a dotting tool and Gelish Hot Rod Red.

Last year I tried blood spatter nails – maybe I’ll have to improve upon that technique.  I have so many Halloween themed ideas.  What should I try next?  Hmmm….

Chickettes.com Dracula & Blood Nails

Halloween Candy Nail Art

$
0
0

Today I did a whimsical Halloween skittle design on my nails.  I wanted to do something candy themed, so I added a lollipop and candy corn.  I did the dots just to tie the colors all together, and I couldn’t think of a third candy design so I stamped a spider web on my pinky and thumb.  LOL  I used lots of different colors in this mani: Gelish Artic Freeze (white), Orange Cream Dream, You Glare I Glow (purple), He Loves Me He Loves Me Not (purple), Amazon Flirt (green), and Ink Daffodillic (yellow).  The spiderweb stamp is from my DRK-A stamping plate, and I used Konad white polish to stamp with.

If I haven’t already mentioned on here, I bought a new XL squishy stamper head and this one works perfectly!!  It’s not too sticky and picks up images with no problems.  I bought it here, in case you’re wondering.  If you’re having trouble picking up images with your XL stamper like I was, I recommend this.

Whimsical Halloween Candy Nail ArtWhimsical Halloween Candy Nail Art

Autumn Trees Nail Art

$
0
0

It’s Autumn in my little part of the world, and the trees are amazing shades of orange, yellow and red.  I knew when I got my new Bundle Monster plate set that I had to do an Autumn themed design with the tree image from plate BM-407.  There are a lot of details in this mani that you may not be able to see.  I started with two coats of Gelish Seafoam, and then used a tiny sponge to sponge some clouds in the sky using Artic Freeze, and I sponged some brown on to create the ground using Strut Your Stuff.  The tree images were stamped on using a black stamping polish and then I took a dotting tool and added some random orange, red and yellow dots with gel polish.

I think this photo shows the most detail.  I really love this design!

Chickettes.com Autumn Trees Nail Art

I also tried it with my Gelish Matte TIO too.  I like the matte effect, but I think I liked it better shiny.  What do you think?  BTW, this is a lot of coats of polish because I applied 2 coats of the matte TIO over top of the regular top coat.  At least my nails feel super strong!  ;)

Chickettes.com Autumn Trees Nail Art

And this is just a different pose.  My lightbox washed out t he colors a little in this one, but it’s the best I could get.

Chickettes.com Autumn Trees Nail Art

Viewing all 131 articles
Browse latest View live